
Azure Kubernetes Service (AKS)를 활용하여 인그레스(Ingress) 리소스를 통해 단일 IP 주소로 여러 서비스를 노출하는 방법을 테스트 해보았다.
인그레스란?
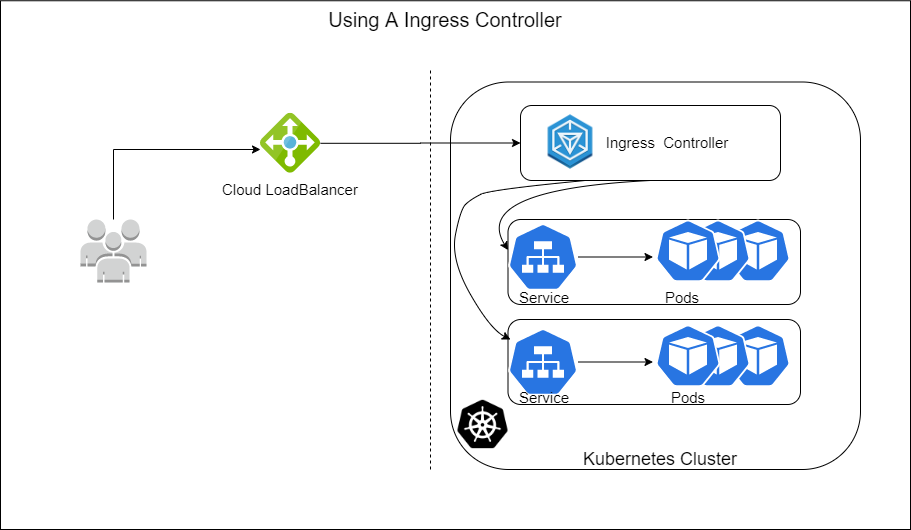
로드밸런서 서비스는 각 서비스마다 자신의 공인 IP 주소를 가진 로드밸런서가 필요하지만, 인그레스는 하나의 IP 주소로 수십 개의 서비스에 접근 가능하도록 지원해준다. 클라이언트가 HTTP 요청을 보낼 때 요청한 호스트(host)와 경로(path)에 따라 요청을 전달할 서비스가 결정된다.
인그레스는 네트워크 스택의 어플리케이션 계층(HTTP)에서 작동한다.
ex) 쿠키 기반의 세션 어피니티 등과 같은 기능 제공
Kubernetes Service
- Service는 다른 Pod의 요청이나 외부 클라이언트로부터 오는 HTTP 요청에 모두 응답한다.
외부 클라이언트가 서비스에 대한 요청을 하려면, 서비스를 노출시키기위해 L4로드밸런서를 사용하는 경우가 일반적이다. 이를 통해 외부 클라이언트의 트래픽이 서비스에 전달된다. 이러한 시나리오에서는 외부 클라이언트 요청을 받는 것이 주요 역할이라고 보면 된다.
인그레스 동작을 위한 필수 요소
Ingress는 URL 기반 로드밸런싱을 하며 구동되려면 뒷단에 Service가 있어야 한다.
Ingress -> Pod는 불가능하며 Ingress -> Service -> Pod 형태로 구성이 되어야 한다.
인그레스는 리소스와 컨트롤러로 구성되는데 yaml로 정의하는 것은 리소스이며 실제 트래픽을 처리하도록 하는 것은 컨트롤러가 한다.
Ingress 동작 방식
테스트 과정을 보기 전에 인그레스 동작 방식을 간단히 알아보자.

- 클라이언트가 DNS 조회
- DNS 서버가 Ingress Cointroller의 주소 반환
- 클라이언트는 HTTP 요청을 Ingress Controller로 전송, host 헤더에서 해당 DNS 지정
- Ingress Controller는 해당 헤더에서 클라이언트가 액세스하려는 서비스 결정하고 서비스와 관련된 엔드포인트 오브젝트로 파드 IP를 조회
- 클라이언트 요청을 파드에 전달
- Ingress Controller는 파드에 요청을 보내며, 요청을 서비스로 전달하지 않고 파드를 선택하는 데만 사용한다.
- Ingress Controller는 연동된 Ingress 리소스에 들어온 트래픽에 대한 경로 정보를 요청하고, 리소스는 연동된 서비스에 경로 요청 후 서비스에 등록된 파드의 엔드포인트를 받아 Ingress Controller 가 전달받은 엔드포인트로 트래픽을 전달
- Ingress Resource는 Rule을 정의하는 리소스, 즉 실제 트래픽은 Ingress Controller가 전달하도록 동작
앞서 말한 Azure Kubernetes Service (AKS)를 활용하여 인그레스(Ingress) 리소스를 통해 단일 IP 주소로 여러 서비스를 노출하는 테스트를 진행하고자 한다.
테스트 환경 설정
1. 변수 설정:
$ResourceGroup = "tiu-ccoe-hr-rg"
$AKSName = "hrAKSCluster"
$Location = "koreacentral"
2. 리소스 그룹(Resource Group) 생성:
- 명칭: tiu-ccoe-hr-rg
- 위치: koreacentral
az group create --name tiu-ccoe-hr-rg --location koreacentral
New-AzResourceGroup -Name tiu-ccoe-hr-rg -Location koreacentral
리소스 그룹 생성 후 확인:
az group list --output table
3. AKS 클러스터 생성 및 연결:
- 명칭: hrAKSCluster
- 리소스 그룹: tiu-ccoe-hr-rg
New-AzAksCluster -ResourceGroupName $ResourceGroup -Name $AKSName -NodeCount 1 -EnableManagedIdentity -GenerateSshKey
- 생성 확인

클러스터 연결: AKS 클러스터에 연결하여 kubectl을 사용합니다.
az aks get-credentials --resource-group $ResourceGroup --name $AKSName
kubectl config view
kubectl config use-context hrAKSCluster


샘플 애플리케이션 배포를 위한 Namespace 생성
1. 네임스페이스(Namespace) 생성
네임스페이스는 Kubernetes 클러스터 내에서 리소스를 구분하고 격리하는 데 사용됩니다. 새로운 네임스페이스를 생성하여 샘플 애플리케이션을 배포할 공간을 만듭니다.
kubectl create namespace sample
2. 샘플 애플리케이션 배포
샘플 애플리케이션을 배포하기 위해 deployment.yaml 파일을 생성하고 적용합니다.
- deployment.yaml 파일의 내용:
$deploymentContent = @"
apiVersion: apps/v1
kind: Deployment
metadata:
  name: aks-helloworld
  namespace: sample
spec:
  replicas: 1
  selector:
    matchLabels:
      app: aks-helloworld
  template:
    metadata:
      labels:
        app: aks-helloworld
    spec:
      containers:
      - name: aks-helloworld
        image: mcr.microsoft.com/azuredocs/aks-helloworld:v1
        ports:
        - containerPort: 80
        env:
        - name: TITLE
          value: "Welcome to Azure Kubernetes Service (AKS)"
"@

Set-Content -Path "deployment.yaml" -Value $deploymentContent

kubectl apply -f deployment.yaml
위 명령어를 실행하면 Kubernetes 클러스터 내에 aks-helloworld 애플리케이션이 배포됩니다. 네임스페이스 sample에서 애플리케이션이 실행됩니다.

샘플 애플리케이션을 서비스로 노출하기 위한 ‘Service’ 리소스 생성
1. ClusterIP 서비스 생성
ClusterIP 서비스는 Kubernetes 클러스터 내부에서만 접근할 수 있는 IP 주소를 할당합니다. 이를 통해 내부 애플리케이션 간의 통신을 설정할 수 있습니다. 생성된 service-clusterip.yaml 파일을 Kubernetes에 적용하여 서비스를 생성합니다.
- service-clusterip.yaml 파일 생성 및 적용:
#ClusterIP

New-Item -Path . -Name "service-clusterip.yaml" -ItemType "file" -Force

$serviceClusterIPContent = @"
apiVersion: v1
kind: Service
metadata:
  name: aks-helloworld-clusterip
  namespace: sample
spec:
  selector:
    app: aks-helloworld
  type: ClusterIP
  ports:
    - protocol: TCP
      port: 80
      targetPort: 80
"@

Set-Content -Path "service-clusterip.yaml" -Value $serviceClusterIPContent

kubectl apply -f service-clusterip.yaml
서비스 상세 정보 확인:
생성된 서비스의 상세 정보를 확인하여, 클러스터 내부 IP 및 포트 정보를 확인할 수 있습니다.
kubectl describe svc aks-helloworld-clusterip -n sample
2. 내부 접속 확인
Kubernetes 클러스터 내부에서 생성된 서비스를 확인하고 접근할 수 있는지 테스트합니다.
- 파드에 접속: 생성된 파드에 접속하여 서비스에 대한 요청을 보냅니다.
kubectl exec -it aks-helloworld-77fbc6b96c-888rb -n sample -- /bin/sh
curl http://aks-helloworld-clusterip:80
curl http://10.0.75.187:80

이 과정을 통해 Kubernetes 클러스터 내에서 샘플 애플리케이션을 배포하고 내부 네트워크를 통해 접근할 수 있는 서비스를 생성하였습니다. 이를 통해 내부 애플리케이션 간의 통신이 원활하게 이루어지는 것을 확인할 수 있습니다.
외부 접근을 위한 Load Balancer 타입의 서비스 설정
이제 외부에서 접근할 수 있도록 로드 밸런서 타입의 서비스를 설정하겠습니다.
1. Load Balancer 서비스 생성
LoadBalancer 타입의 서비스는 클러스터 외부에서 접근할 수 있는 공인 IP 주소를 할당받아 외부 트래픽을 클러스터 내부의 서비스로 전달합니다.
- service-loadbalancer.yaml 파일 생성 및 적용
New-Item -Path . -Name "service-loadbalancer.yaml" -ItemType "file" -Force

$serviceLoadBalancerContent = @"
apiVersion: v1
kind: Service
metadata:
  name: aks-helloworld-loadbalancer
  namespace: sample
spec:
  selector:
    app: aks-helloworld
  type: LoadBalancer
  ports:
    - protocol: TCP
      port: 80
      targetPort: 80
"@

Set-Content -Path "service-loadbalancer.yaml" -Value $serviceLoadBalancerContent

kubectl apply -f service-loadbalancer.yaml
서비스 상세 정보 확인:
생성된 서비스의 상세 정보를 확인하여, 클러스터 내부 IP 및 외부 IP 정보를 확인할 수 있습니다.
kubectl describe svc aks-helloworld-loadbalancer -n sample
2. 내부 접속 확인
Kubernetes 클러스터 내부에서 생성된 서비스에 접근하여 올바르게 동작하는지 확인합니다.
- 파드에 접속: 생성된 파드에 접속하여 서비스에 대한 요청을 보냅니다.
kubectl exec -it aks-helloworld-77fbc6b96c-888rb -n sample -- /bin/sh
curl http://aks-helloworld-loadbalancer:80
curl http://10.0.235.234:80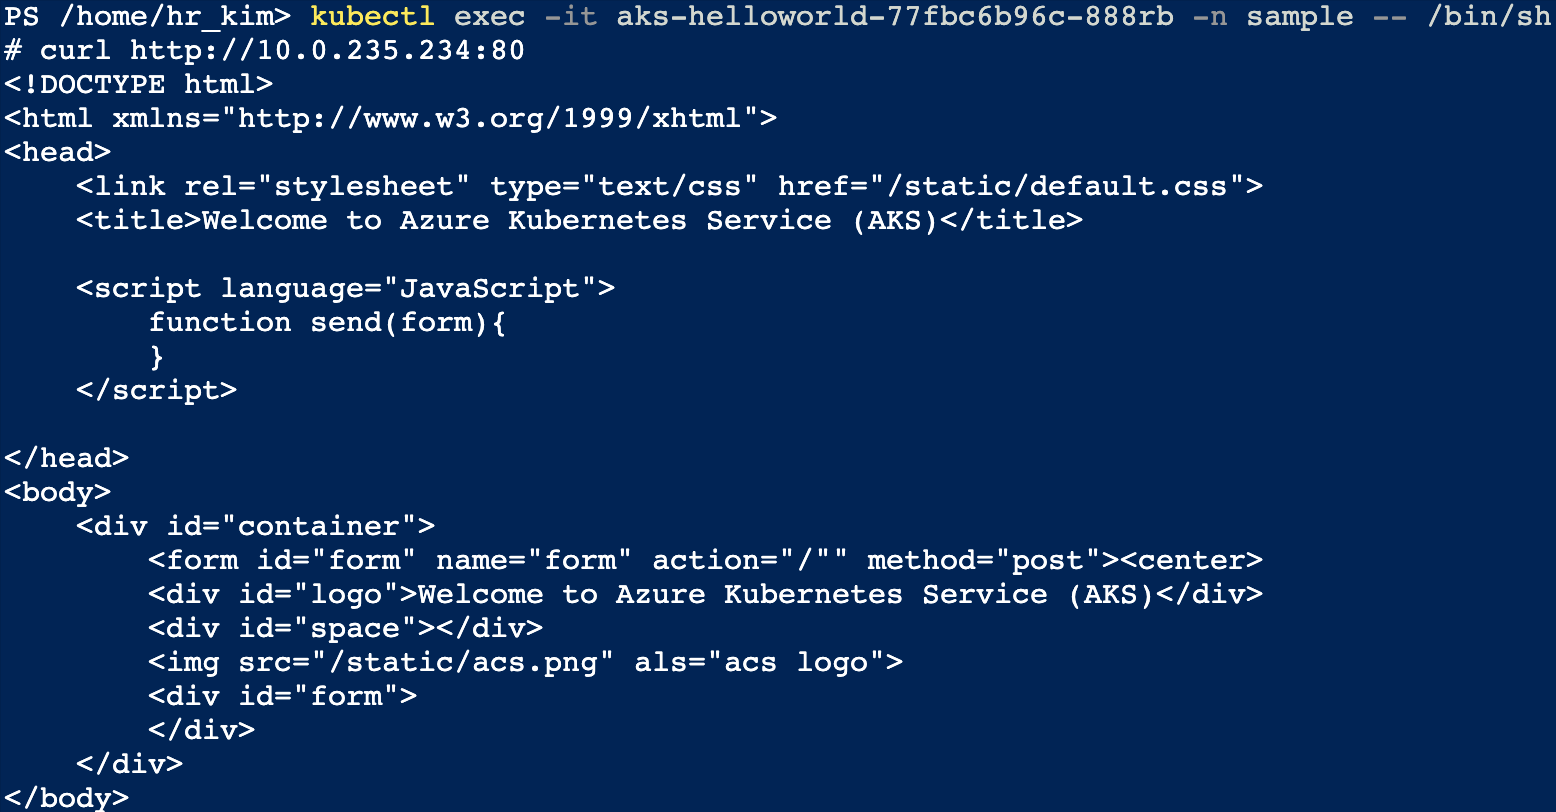
3. 외부 접속 확인
생성된 LoadBalancer 서비스의 외부 IP를 통해 외부에서 접근할 수 있는지 확인합니다.
- 외부 IP 확인: LoadBalancer 서비스의 외부 IP는 kubectl describe svc aks-helloworld-loadbalancer -n sample 명령어의 출력에서 확인할 수 있습니다. (외부 IP = 20.249.195.7)

Ingress를 사용하여 여러 서비스에 트래픽 라우팅
Kubernetes 클러스터 내부의 서비스에 외부 트래픽을 라우팅하기 위해 Ingress를 사용합니다. Ingress는 여러 서비스를 관리하거나 도메인 및 경로 기반 라우팅이 필요한 경우 적합합니다. 이번에는 두 개의 서비스 (aks-helloworld-v1, aks-helloworld-v2)를 설정하고 Ingress를 사용하여 트래픽을 각 서비스로 라우팅하는 과정을 테스트해보겠습니다.

aks-helloworld-v2 서비스 생성
먼저 aks-helloworld-v2 배포 및 서비스를 생성합니다.
1. deployment-helloworld-v2.yaml 파일 생성 및 적용
New-Item -Path . -Name "deployment-helloworld-v2.yaml" -ItemType "file" -Force

$deploymentV2Content = @"
apiVersion: apps/v1
kind: Deployment
metadata:
  name: aks-helloworld-v2
  namespace: sample
spec:
  replicas: 1
  selector:
    matchLabels:
      app: aks-helloworld-v2
  template:
    metadata:
      labels:
        app: aks-helloworld-v2
    spec:
      containers:
      - name: aks-helloworld-v2
        image: mcr.microsoft.com/azuredocs/aks-helloworld:v1
        ports:
        - containerPort: 80
        env:
        - name: TITLE
          value: "Welcome to Azure Kubernetes Service (AKS) - v2"
"@

Set-Content -Path "deployment-helloworld-v2.yaml" -Value $deploymentV2Content

kubectl apply -f deployment-helloworld-v2.yaml
2. service-helloworld-v2.yaml 파일 생성 및 적용
New-Item -Path . -Name "service-helloworld-v2.yaml" -ItemType "file" -Force

$serviceV2Content = @"
apiVersion: v1
kind: Service
metadata:
  name: aks-helloworld-v2
  namespace: sample
spec:
  selector:
    app: aks-helloworld-v2
  type: ClusterIP
  ports:
    - protocol: TCP
      port: 80
      targetPort: 80
"@

Set-Content -Path "service-helloworld-v2.yaml" -Value $serviceV2Content

kubectl apply -f service-helloworld-v2.yaml
이제 두 개의 서비스(aks-helloworld 및 aks-helloworld-v2)가 클러스터 내에 생성되었습니다. 다음 단계에서는 Ingress를 설정하여 외부 트래픽을 두 서비스로 라우팅하도록 구성할 것입니다.
Ingress Controller 설치 및 설정
Ingress Controller를 설치하고 Ingress 리소스를 생성하여 여러 서비스에 트래픽을 라우팅하도록 설정합니다.
1. Ingress Controller 설치
Ingress Controller를 설치하기 위해 Helm을 사용합니다. Ingress Controller는 외부 트래픽을 Kubernetes 클러스터 내의 서비스로 라우팅합니다.
1. Helm 리포지토리 추가 및 업데이트
$env:NAMESPACE="ingress-basic"

helm repo add ingress-nginx https://kubernetes.github.io/ingress-nginx
helm repo update
2. Ingress Controller 설치
helm install ingress-nginx ingress-nginx/ingress-nginx `
  --create-namespace `
  --namespace $env:NAMESPACE `
  --set controller.service.annotations."service\.beta\.kubernetes\.io/azure-load-balancer-health-probe-request-path"=/healthz `
  --set controller.service.externalTrafficPolicy=Local
3. 외부 IP 확인:
Ingress Controller가 설치된 후 외부 IP를 확인하여 Ingress 리소스에 사용할 수 있습니다.
kubectl get services --namespace $env:NAMESPACE -o wide -w ingress-nginx-controller
2. Ingress 리소스 생성 및 적용
Ingress 리소스를 생성하여 두 개의 서비스 (aks-helloworld, aks-helloworld-v2)에 트래픽을 라우팅하도록 설정합니다.
1. Ingress 리소스 정의
$ingressContent = @"
apiVersion: networking.k8s.io/v1
kind: Ingress
metadata:
  name: aks-helloworld-ingress
  namespace: sample
  annotations:
    nginx.ingress.kubernetes.io/ssl-redirect: "false"
    nginx.ingress.kubernetes.io/use-regex: "true"
    nginx.ingress.kubernetes.io/rewrite-target: /$2
spec:
  ingressClassName: nginx
  rules:
  - host: "helloworld.20.249.192.160.nip.io"
    http:
      paths:
      - path: /v1(/|$)(.*)
        pathType: ImplementationSpecific
        backend:
          service:
            name: aks-helloworld-v1
            port:
              number: 80
      - path: /v2(/|$)(.*)
        pathType: ImplementationSpecific
        backend:
          service:
            name: aks-helloworld-v2
            port:
              number: 80
"@

Set-Content -Path "ingress.yaml" -Value $ingressContent
kubectl apply -f ingress.yaml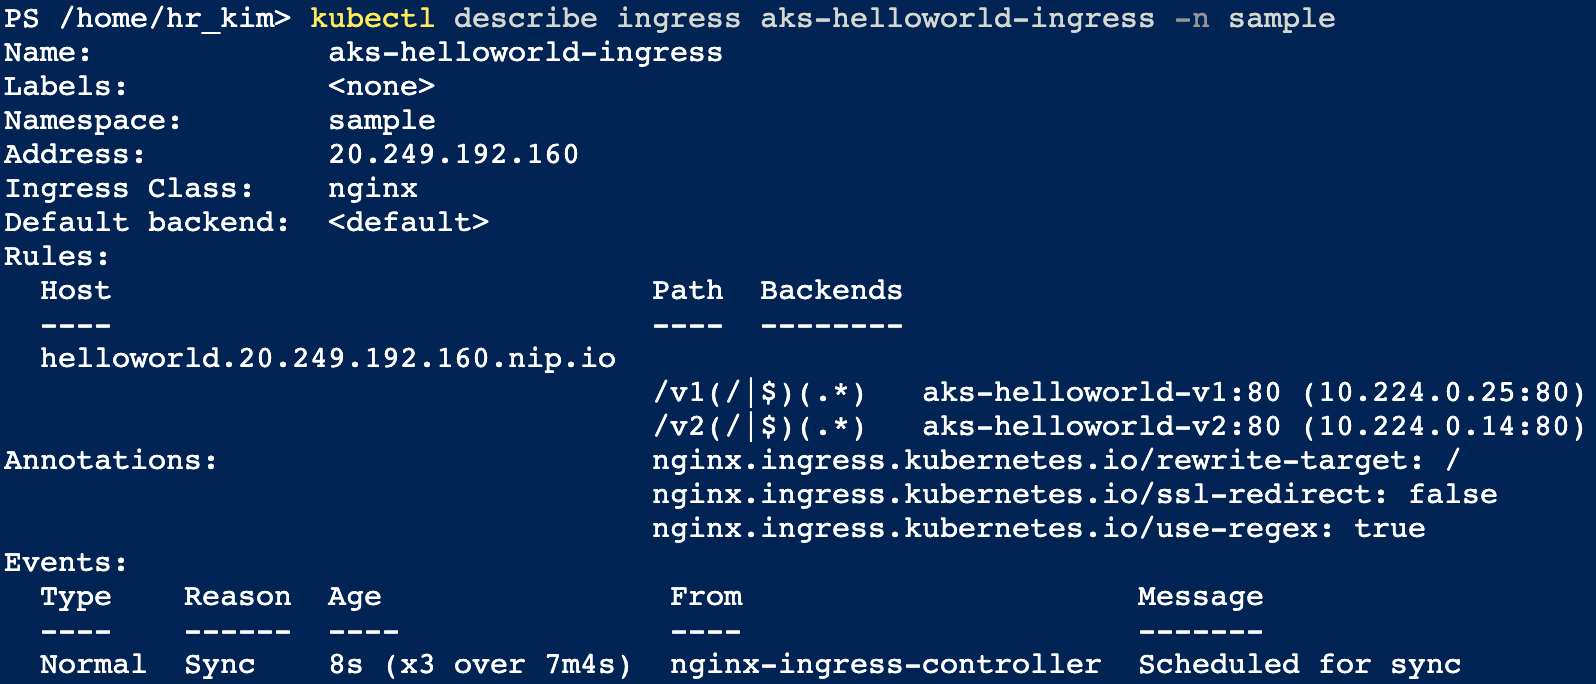
3. Ingress 설정 결과 확인
Ingress 설정 후, 외부에서 각 서비스로의 라우팅이 제대로 이루어지는지 확인합니다.
- 외부 도메인 접근:
- http://helloworld.20.249.192.160.nip.io/v1 : aks-helloworld 서비스로 라우팅
- http://helloworld.20.249.192.160.nip.io/v2 : aks-helloworld-v2 서비스로 라우팅
- 웹 브라우저를 통해 외부 도메인에 접근하여 서비스가 올바르게 라우팅되는지 확인합니다.
curl http://helloworld.20.249.192.160.nip.io/v1
curl http://helloworld.20.249.192.160.nip.io/v2


이 과정을 통해 두 개의 서비스(aks-helloworld, aks-helloworld-v2)가 Ingress를 통해 외부 트래픽을 처리하고 올바르게 라우팅되는 것을 확인할 수 있습니다. 이를 통해 Kubernetes 클러스터에서 Ingress를 사용하는 방법을 이해할 수 있습니다.