
1. 목표 정의 (Use Case)
배경
한 스타트업 회사 "Data Insights Co." 는 여러 형태의 데이터를 수집하여 분석하고, 비즈니스 의사결정에 활용하고 싶다.
이 회사는 고객의 행동 패턴, 매출 데이터, 로그 데이터 등을 분석해 더 나은 서비스 전략을 수립하는 것이 목표다.
주요 요구사항
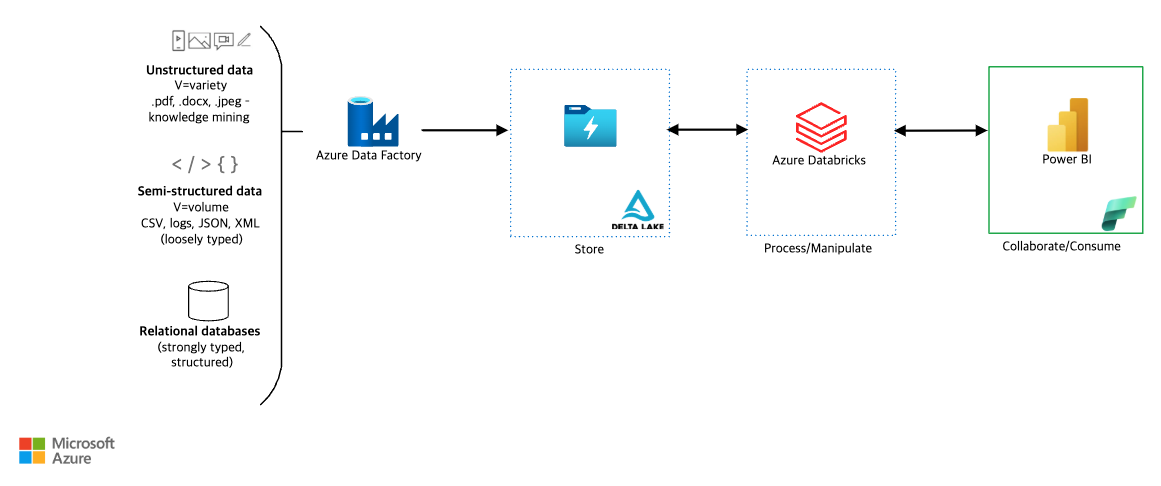
- 정형 데이터(관계형 데이터베이스), 반정형 데이터(JSON, CSV, XML), 비정형 데이터(PDF, 이미지, 문서 등)를 통합하여 저장
- 데이터 변환 및 가공 후, Power BI를 통해 시각화 및 인사이트 제공
- 확장 가능한 구조로 설계하여 이후 AI/ML 분석 기능 추가 가능하도록 구성
2. 아키텍처 설계
사용할 Azure 서비스
데이터 수집 (Ingestion)
- Azure Data Factory (ADF)
- 정형 데이터 (SQL, ERP 시스템) ETL 처리
- 반정형 데이터 (JSON, CSV) 배치 로드
- 비정형 데이터 (PDF, 이미지) 수집 및 Azure Cognitive Services 활용 가능
데이터 저장 (Storage)
- Azure Data Lake Storage (Delta Lake)
- 모든 형태의 데이터를 저장할 수 있도록 통합 저장소 역할 수행
- 데이터 정합성을 유지하기 위해 Delta Lake를 사용하여 버전 관리 및 ACID 트랜잭션 지원
데이터 처리 및 변환 (Processing & Manipulation)
- Azure Databricks
- Spark 기반으로 대량의 데이터를 변환 및 전처리
- Delta Lake와 연계하여 분석 모델 적용 가능
- 데이터 클렌징 및 집계 수행
데이터 소비 및 시각화 (Consumption)
- Power BI
- 데이터 모델을 로드하여 대시보드 및 리포트 제공
- 비즈니스 인사이트 생성
3. 데이터 흐름
- 데이터 수집
- Azure Data Factory가 관계형 DB(SQL), 반정형 데이터(JSON, CSV), 비정형 데이터(PDF, 이미지)를 수집하여 Azure Data Lake에 저장
- 데이터 변환 및 처리
- Azure Databricks에서 Delta Lake 데이터를 불러와 전처리 및 변환 수행
- 대용량 데이터 집계 및 분석 모델 적용
- 데이터 소비
- 정제된 데이터를 다시 Delta Lake에 저장하거나, Power BI에서 직접 로드 가능
- Power BI를 활용하여 실시간 대시보드 및 리포트 생성
4. 구축 과정 (Terraform 적용)
Azure 리소스 생성 (Terraform)
Terraform을 사용하여 자동화된 인프라 구축을 수행하며, 주요 모듈은 다음과 같다.
Terraform 프로젝트 디렉토리 구조
TF-AZURE-DATA-PLATFORM/
│── .github/workflows/               # GitHub Actions 설정 (Infracost 자동 실행)
│   ├── infracost.yml                # Infracost 비용 분석 자동화 스크립트
│── modules/                          # Terraform 모듈 폴더
│   ├── data_factory/                 # Azure Data Factory 모듈
│   ├── databricks/                   # Azure Databricks 모듈
│   ├── networking/                    # 네트워크 설정 모듈
│   ├── resource_group/                # 리소스 그룹 생성 모듈
│   ├── storage_account/               # Azure Storage 계정 모듈
│   ├── storage_container/             # Blob Storage 컨테이너 모듈
│── main.tf                            # Terraform 메인 구성 파일
│── outputs.tf                         # Terraform Outputs 정의
│── plan.json                          # Infracost 비용 분석을 위한 Terraform Plan 파일
│── providers.tf                       # Terraform Provider 설정
│── terraform.tfstate                   # Terraform 상태 파일
│── terraform.tfvars                    # 변수 정의 파일
│── infracost-usage.yml                 # Infracost 비용 예측을 위한 사용량 파일
│── variables.tf                        # 변수 정의 파일
각 주요 파일 설명
- main.tf: Terraform 리소스 정의
- variables.tf: 변수 값 선언
- outputs.tf: 생성된 리소스의 결과 출력
- .github/workflows/infracost.yml: GitHub Actions 자동 실행
- infracost-usage.yml: 예상 사용량 설정
Terraform 모듈 구성
module "resource_group" {
  source              = "./modules/resource_group"
  resource_group_name = var.resource_group_name
  location            = var.location
}

module "storage_account" {
  source              = "./modules/storage_account"
  resource_group_name = module.resource_group.resource_group_name
  storage_account_name = var.storage_account_name
}

module "storage_container" {
  source               = "./modules/storage_container"
  container_name       = "raw-data"
  storage_account_name = module.storage_account.storage_account_name
}

module "data_factory" {
  source              = "./modules/data_factory"
  resource_group_name = module.resource_group.resource_group_name
  data_factory_name   = var.data_factory_name
}

module "databricks" {
  source                  = "./modules/databricks"
  resource_group_name     = module.resource_group.resource_group_name
  databricks_workspace_name = var.databricks_workspace_name
  databricks_workspace_id = module.databricks.databricks_workspace_id
}
Terraform 실행 순서
git clone https://github.com/your-repo/tf-azure-data-platform.git
cd tf-azure-data-platform
terraform init
terraform plan
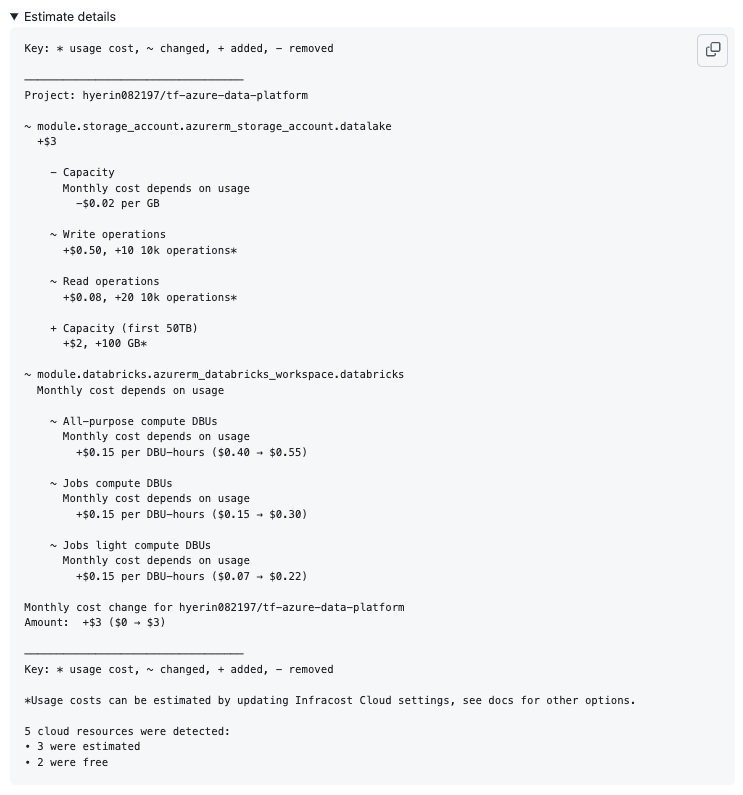
terraform apply -auto-approveInfracost 적용 (비용 분석)
GitHub Actions를 사용하여 Infracost를 통해 비용 분석을 수행한다.
- name: Run Infracost
  run: |
    infracost breakdown --path=. --usage-file=infracost-usage.yml --format=json --out-file=/tmp/infracost.json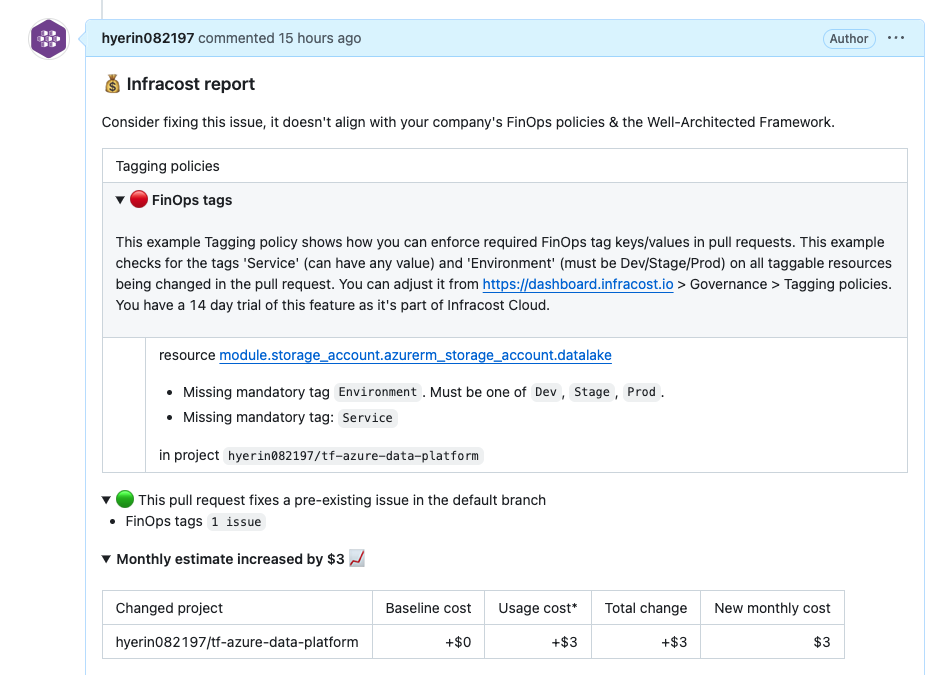
- Terraform을 활용한 인프라 자동화 성공
- Databricks를 활용한 AI/ML 데이터 처리 구축 완료
- Infracost를 이용한 비용 최적화 적용
향후 발전 방향
- Databricks Spot VM 적용하여 비용 절감
- Azure Synapse Analytics 연계하여 데이터 웨어하우스 확장
- Slack 알림을 추가하여 비용 변동 감지 자동화
Terraform + Azure + Databricks + Infracost를 활용한 클라우드 데이터 플랫폼 구축 성공했다. 이제 이 환경을 확장하여 AI/ML 분석을 더욱 강화하고, 비용 절감 최적화를 지속적으로 진행해야겠다.
참고 (Databricks MLflow 배포 가이드)
Databricks에서 MLflow를 활용하여 모델을 훈련하고, 등록하고, 배포한 후 API로 예측을 수행하는 전체 과정
- 랜덤 포레스트(RandomForest) 모델을 훈련하여, 고객이 마케팅 캠페인에 반응할지 예측
- Databricks MLflow를 활용하여 모델을 훈련, 저장, 배포
- REST API를 통해 모델을 호출하여 예측 수행
데이터 수집 및 전처리
- UCI Bank Marketing Dataset 사용
- 데이터 출처
UCI Machine Learning Repository - Bank Marketing Dataset - bank_additional_full.csv 파일을 Databricks FileStore(DBFS)에 업로드
- 업로드 경로: /FileStore/tables/bank_additional_full.csv
- pd.get_dummies()로 카테고리 변수 인코딩
- train_test_split()을 사용하여 Train / Test 데이터 분할
- 데이터 설명
- 이 데이터는 포르투갈 은행의 전화 마케팅 캠페인 결과를 포함하고 있으며, 고객이 정기예금 상품을 가입할지 여부(y 변수)를 예측하는 분류 문제입니다.
- age, job, marital, education, balance, housing, loan 등 총 20개 이상의 특성(features)을 포함함
Databricks에서 모델 훈련 및 등록
MLflow Experiment 설정 & 모델 훈련
import mlflow
import mlflow.sklearn
import pandas as pd
from sklearn.ensemble import RandomForestClassifier
from sklearn.model_selection import train_test_split
from sklearn.metrics import accuracy_score

# 데이터 로드
df = pd.read_csv("/dbfs/FileStore/tables/bank_additional_full.csv", sep=";")

# 'y'가 타겟 변수
X = df.drop("y", axis=1)
y = df["y"]

# Categorical 변수 인코딩
X = pd.get_dummies(X)

# Train/Test 데이터 분할
X_train, X_test, y_train, y_test = train_test_split(X, y, test_size=0.2, random_state=42)

# MLflow Experiment 설정
mlflow.set_experiment("/Shared/databricks-experiment")

with mlflow.start_run():
    model = RandomForestClassifier(n_estimators=100)
    model.fit(X_train, y_train)

    # 성능 평가
    y_pred = model.predict(X_test)
    acc = accuracy_score(y_test, y_pred)
    mlflow.log_metric("accuracy", acc)

    # 모델 저장 & 등록
    input_example = X_test.iloc[:1]  # 샘플 입력 데이터 포함
    model_info = mlflow.sklearn.log_model(
        model, "random_forest_model", input_example=input_example
    )

    registered_model_uri = mlflow.register_model(model_info.model_uri, "bank_marketing_rf_model")

print("모델이 Databricks에 등록되었습니다!")
REST API를 사용하여 모델 예측
API 호출 예제 (Python)
import requests
import json

# Databricks Model Serving URL (Databricks UI에서 확인)
url = "https://xxx.azuredatabricks.net/model/bank_marketing_rf_model/xxx"

# Databricks Personal Access Token
token = "xxxx"

headers = {
    "Authorization": f"Bearer {token}",
    "Content-Type": "application/json"
}

# 예측할 입력 데이터 (모델이 기대하는 컬럼과 일치해야 함)
data = {
    "dataframe_records": [
        {
            "age": 30,
            "duration": 120,
            "campaign": 1,
            "pdays": 999,
            "previous": 0,
            "emp.var.rate": 1.1,
            "cons.price.idx": 93.994,
            "cons.conf.idx": -36.4,
            "euribor3m": 4.857,
            "nr.employed": 5191.0,
            "job_admin.": 1,
            "job_blue-collar": 0,
            "marital_single": 1,
            "education_university.degree": 1,
            "default_no": 1,
            "housing_yes": 1,
            "loan_no": 1,
            "contact_cellular": 1,
            "month_may": 1,
            "day_of_week_mon": 1,
            "poutcome_failure": 1
        }
    ]
}

# API 호출
response = requests.post(url, headers=headers, data=json.dumps(data))

# 응답 처리
if response.status_code == 200:
    print("예측 결과:", response.json())
else:
    print(f"Request failed with status code {response.status_code}")
    print("Response content:", response.text)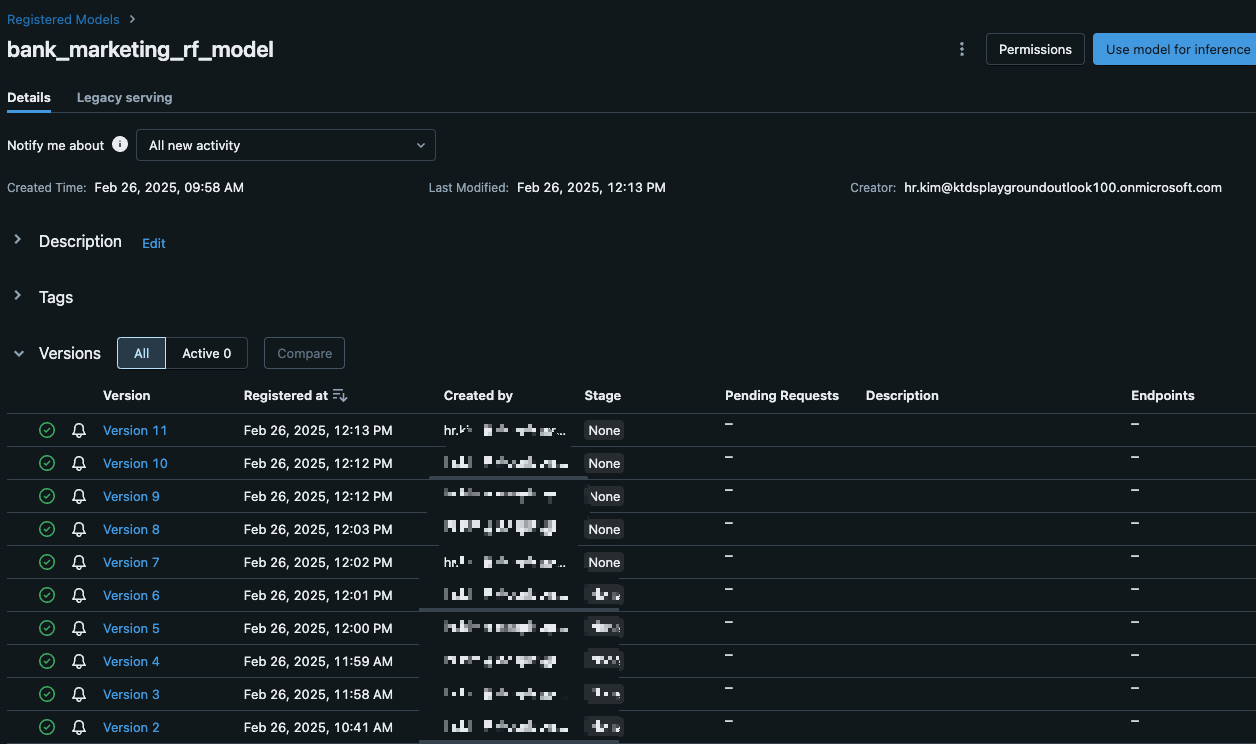
'Azure' 카테고리의 다른 글
| [Azure] Azure Databricks 보안 네트워크 구성 (Terraform 기반) (0) | 2025.03.11 |
|---|---|
| Self Service 환경과 Multi-Tenancy 구현을 위한 Virtual Kubernetes Cluster (0) | 2025.01.10 |
| [CI/CD] GitHub Actions와 Trivy를 활용한 Vulnerability Scanning 자동화 (0) | 2024.12.10 |
| [CI/CD] Container 기반 CI/CD 파이프라인: GitOps와 ArgoCD를 활용한 배포 자동화 (0) | 2024.12.10 |
| [CI/CD] VM 기반 CI/CD 파이프라인: Azure Storage와 Jenkins를 활용한 자동화 가이드 (0) | 2024.12.10 |